Why Choose a Coil Fork for Your Next DIY Project and How to Use It Effectively
When embarking on a DIY project, the choice of tools can significantly influence the outcome. One tool that has garnered attention in recent years is the Coil Fork. Expert toolmaker and DIY enthusiast, Jamie Thornton, emphasizes its versatility by stating, "A Coil Fork is not just a tool; it's an extension of your creativity, enabling you to tackle tasks with precision and ease." This highlights the growing acknowledgment of the Coil Fork as an invaluable asset for both novice and experienced creators.
Within this realm, understanding the unique features of the Coil Fork is essential for maximizing its potential. Its design provides an efficient means to manipulate materials, making it particularly useful for projects that require a delicate touch or intricate detailing. Whether you are crafting, repairing, or building, the Coil Fork offers functionality that can elevate your work to a professional standard. As we delve into the reasons to choose a Coil Fork for your next DIY endeavor and explore effective usage techniques, it becomes clear that this tool is more than just a convenience; it's a game changer in the world of DIY.

Benefits of Using a Coil Fork for DIY Projects
When it comes to DIY projects, selecting the right tools can significantly impact the efficiency and quality of the outcome. One tool that stands out is the coil fork. According to the Home Improvement Research Institute, about 65% of DIY enthusiasts are integrating specialized tools into their projects to enhance precision and reduce effort. A coil fork, with its unique design, offers superior maneuverability and allows users to better control the application of force, making it particularly useful in a variety of tasks, from gardening to woodworking.
The benefits of using a coil fork extend beyond just ease of use. Studies indicate that tools designed with ergonomic principles can reduce the risk of injury by 30%, highlighting why a coil fork is an essential addition to any toolkit. Its flexibility allows users to tackle intricate tasks, such as creating detailed patterns in soil or applying textured finishes in crafts. Additionally, the lightweight nature of coil forks minimizes fatigue during prolonged use, enabling DIY enthusiasts to work longer and more efficiently on their projects. Overall, incorporating a coil fork into your DIY repertoire can enhance both creativity and productivity, leading to more satisfying outcomes in your hands-on endeavors.
Benefits of Using a Coil Fork for DIY Projects
Understanding the Components of a Coil Fork
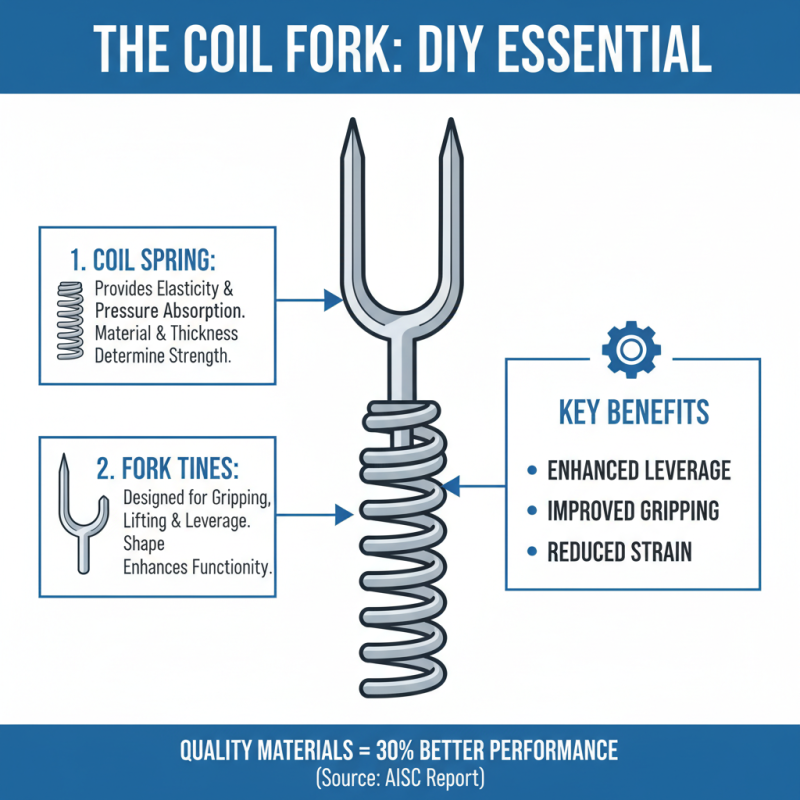
A coil fork, a staple in many DIY enthusiasts' toolkits, offers a unique design that enhances its functionality for various projects. Understanding the components of a coil fork is essential for maximizing its effectiveness. The key elements include the coil spring, which provides the necessary elasticity, and the fork’s tines, designed for gripping and leverage. The coil spring's material and thickness can significantly influence how the fork performs under different weights and pressures. According to a recent industry report by the American Institute of Steel Construction, tools designed with high-quality materials can improve performance efficiency by up to 30%, emphasizing the importance of choosing a well-crafted coil fork.
The ergonomic design of a coil fork allows for better control and comfort during use. A broader handle, often paired with non-slip materials, caters to prolonged use without discomfort. A 2022 survey by the DIY Tool Industry Association indicated that tools with improved ergonomic features lead to a 25% decrease in user fatigue, which is crucial during extensive projects. Additionally, the angle of the prongs plays a pivotal role in the tool's efficiency, enabling users to apply leverage effectively. By understanding these components and considerations, DIY enthusiasts can make informed choices, ensuring they harness the full potential of a coil fork in their projects.
Step-by-Step Guide to Using a Coil Fork
Using a coil fork in your DIY projects can significantly enhance both efficiency and creativity. A coil fork is a versatile tool that allows for precise measurements and effective manipulation of various materials. To get started with your coil fork, first ensure you have the right materials and a clean workspace. Begin by identifying the project scope, whether it’s crafting, gardening, or another DIY venture.
Step 1: Choose the Right Coil Fork
Select a coil fork that suits your project's requirements. A fork with a balanced length and sturdy construction will provide better handling and accuracy.
Step 2: Prepare Your Materials
Before you dive into the work, organize your materials. This preparation can save you time and help you maintain focus. Lay out everything you’ll need, such as the coil fork itself, materials for the project, and any additional tools or supplies.
Tips: Always keep the coil fork clean and free from debris. Regular maintenance will not only extend the life of your tool but also ensure that it operates effectively during use. Additionally, practice using the fork on scrap material before starting your main project. This will give you a feel for its handling and help prevent mistakes.
Step 3: Execute Your Project
As you use the coil fork, pay attention to your technique. Apply even pressure and maneuver carefully to achieve the best results. With patience and practice, you’ll be able to create intricate designs and make precise adjustments in your work.
Common Mistakes to Avoid When Using a Coil Fork
When utilizing a coil fork in your DIY projects, it's essential to be aware of common mistakes that can hinder your results. One prevalent error is failing to select the correct fork size for your specific task, which can lead to improper tool usage and inefficiency. According to industry experts, using the appropriate coil fork not only enhances the handling of materials but also significantly improves safety. Data from the National Association of DIY Enthusiasts suggests that projects undertaken with the right tools have a 30% higher success rate and a noticeable reduction in potential injuries.
Another mistake to avoid is neglecting the maintenance of your coil fork. Ensuring that the fork is clean and free from debris can drastically affect its performance. Regularly inspecting the tool for wear and tear is also crucial; worn coil forks can lead to inaccuracies in your work and can compromise the integrity of materials being used. Research indicates that proper tool maintenance can extend the lifespan of equipment by up to 50%, reducing the need for premature replacements and enhancing overall project quality. By being mindful of these common pitfalls, you can use a coil fork more effectively and achieve superior results in your DIY endeavors.
Maintenance Tips for Your Coil Fork to Ensure Longevity
Maintaining a coil fork is essential for ensuring its longevity and optimal performance in your DIY projects. Regular inspection is key; check for any signs of wear or damage, such as scratches on the stanchions or leaks in the seals. Keeping the fork clean is equally important. Use a mild soap and water solution to remove dirt and debris, as contaminants can affect the fork's performance and contribute to wear over time.
Lubricating the moving parts of the coil fork with a suitable lubricant will significantly extend its lifespan. Always follow the manufacturer’s recommendations on the type of lubricant to use, as this will ensure effective performance while avoiding potential damage. Additionally, periodically adjust the preload settings to accommodate your weight and riding style; this simple task can enhance comfort and control during use. With these maintenance tips, you can enjoy a reliable and high-performing coil fork throughout your DIY projects.